
Seared Scallops with Lemon and Pistachio Gremolata

Serves 2
- 1 pound Jumbo Scallops ( 8 pieces)
- Parsley
- 1/4 cup Cilantro
- 1/4 cupPistachio
- 1 Tbl Lemon Zest
- 1 Tsp Lemon Juice
- 1 garlic clove grated

Portuguese Baked Eggs
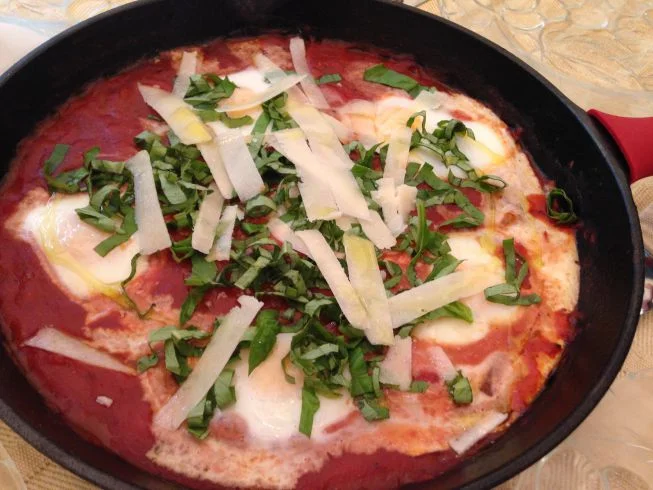
Shakshuka is one of my favorite crowd pleasers. Why? It's a one pan wonder, cooks quickly and is quite the stunner on the table. Everyone gets to dig in together and it makes for a nice centered conversation piece. This Portuguese spin on baked eggs really just reflects a different use of spices than the traditional Middle Eastern version. It is slightly smokier, a bit spicy and has a nice bite at the end from the Manchego that is shaved on top upon serving.
Here's what you'll need:
1 12 in cast iron or oven proof pan
6 small eggs (4 if they are large)
1 28 ounce can of Marzano Crushed Tomato
2 roasted red peppers- julienne
1 small brown onion- julienne
4 large garlic cloves- minced
1 tsp smoked paprika
1 1/2 tsp chili powder
1/2 tsp cayenne (or more if you like it hot!)
1/4 cup fresh basil
Manchego cheese for shaving
Olive oil
Salt
Cracked black pepper
1. Heat oven to 350 degrees.
2. Heat your cast iron or oven proof pan on the stove at medium heat. Add a tablespoon of olive oil and allow it to cover the pan.
3. Once hot, add your julienne onions and let sweat until translucent and slightly turning brown on the edges. Add a dash of salt to help them sweat!
4. Add the chili powder, paprika and cayenne to the onions and allow the oil to cook the spices for just another minute or so.
4. Add the chopped garlic and let toast just until golden brown. Once it's a little golden that's your cue it's done and on the brink of burning.
5. Add the roasted peppers, can of crushed tomatoes and let stew for 10 minutes until sauce thickens.
6. Break an egg into a separate small bowl. Be sure to take out any bits of shell just in case.
7. With your cooking spoon, make a little saucer hole in your thickened tomato sauce. Take your bowl with your raw egg and carefully drop your egg into the hole.
8. Repeat with remaining eggs.
9. Place into your 350 degree oven on the top rack and let broil until egg whites are firmed but yolks are still runny. This usually takes about 8-11 minutes.
10. Remove from oven and top with torn or chopped basil. Finish with shredded Manchego cheese or Pecorino Romano.
Serve with warm pita or crusty bread.
Middle Eastern Shredded Lamb TACOS
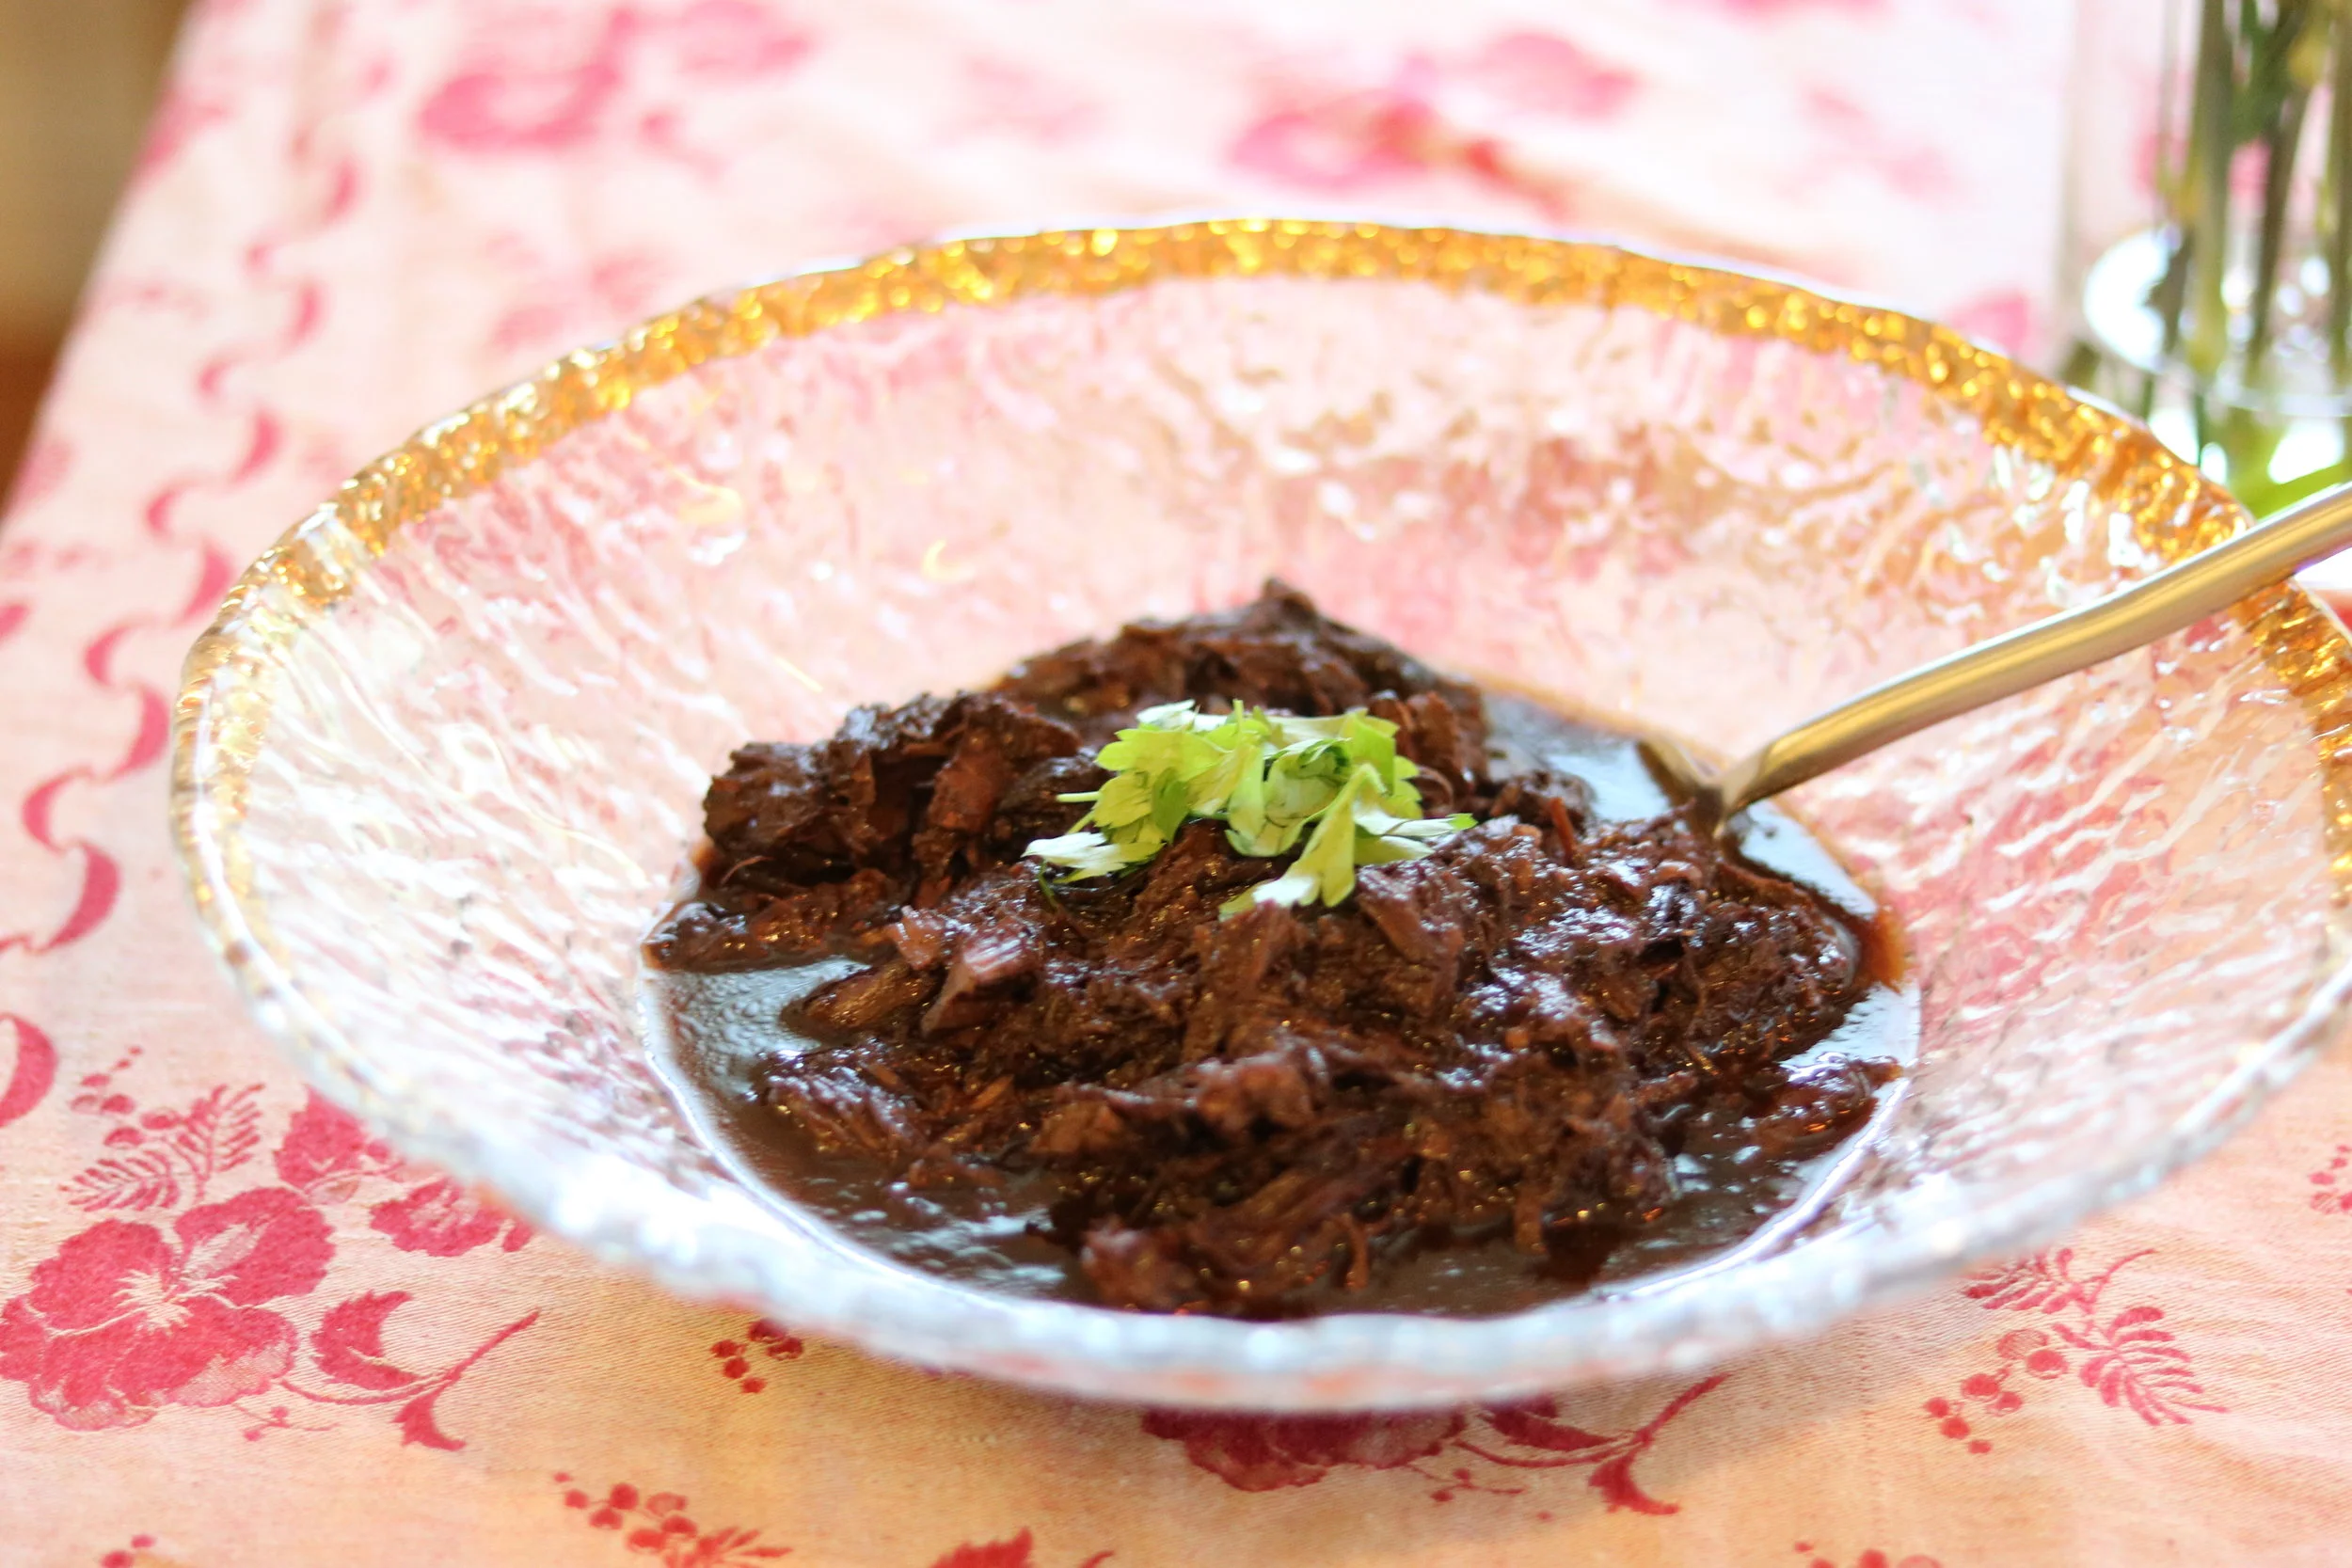
This recipe happens to be very special to me. It comes from a cheat sheet given to me by a chef I particularly admire from Los Angeles, but I won't tell just in case! This lamb is juicy, flavorful and smells infectious. Your whole house will smell of cinnamon and warmth, and your taste buds will crave the taste of this lamb, over and over.
My favorite way to serve this lamb is as a taco, with my special pickled pomegranate red onions and garlicy lemon yogurt sauce. It's a great make ahead dish that can be done a day or two beforehand and is perfect for serving at parties. However, you can always serve this lamb with cous cous, rice or whatever you like! It's a one pot wonder that you can just set and forget!
COOK TIME: 8-10 Hours
SERVES: 4-6
Here's what you'll need:
1 large dutch oven (that can hold at least 6 quarts)
1 lamb shoulder with bone in (3.5 lbs)
1 1⁄2 qt veal stock or beef stock (use the best quality you can find)
1 1⁄2 qt red wine (I prefer to use a merlot or a zinfandel. Something with a bit of a sweeter flavor)
1 carrot, roughly chopped
1 yellow onion, quartered
1⁄2 bunch celery, roughly chopped
5 garlic cloves, peeled
4 bay leaves
1 TB black peppercorn
1⁄2 tsp coriander seed
1⁄2 tsp cumin
1⁄2 tsp cayenne
1⁄2 tsp paprika
3 cinnamon stick
Stage 1: The Lamb
1. Add all chopped ingredients, spices, liquids and lamb shoulder into your dutch oven. It's gonna be full! Cook covered at 350 degrees until it's falling off the bone. This takes about 4 hours. You'll know it's done once the meat separates from the bone or when you attempt to shred the meat and it flakes off.
2. Once done, pull it out of the oven and remove the shoulder into a bowl or onto a cutting board. Let it rest for 20 minutes to make sure it retains its juices and to cool down a bit.
3. Strain the sauce to remove all the vegetables and whole spices through a sieve. Pour the strained sauce back into pot and discard the rest. Set this aside on your stove top.
3. Time to shred! Using two forks, begin to shred the lamb off the bone. Don't worry about making it too perfect, once it's back in its liquids it will shred down further.
4. Place the shredded lamb in tupperware or a bowl and pour just enough of your strained sauce to cover the lamb. (we wanna keep it moist!).
If you're planning on serving this immediately, set the lamb aside fully covered, and continue onto Stage 2.
If you're making this a day ahead, you can place both the shredded lamb covered and tightly sealed into the fridge along with your stock pot (as is) with your strained sauce. The sauce will harden in the fridge, allowing the fat to harden and float to the top, making the next step under stage 2 very easy!
Stage 2: The Sauce
1. If you've kept your sauce in the fridge overnight, this will be quite easy. Just lightly tap and break the fat and discard of the white chocolate looking layer! You'll see what I mean. If you did not harden the fat overnight, do your best with a spoon to skim the top of the sauce, trying to remove just the liquid fat.
2. Next, on your stove top on med-high heat, allow the sauce to reduce down by 1/2. This should take about 2 hours. Doing this will give the sauce depth and more body.
3. Season the sauce. Adding another 1/2 teaspoon of cayenne, salt and a bit more cinnamon is usually what I like to add.
4. Add the lamb back in! Your lamb can be added in straight from your refrigerated container. You'll see fat from this sauce, and that's ok! Put the whole thing back into the pot!
5. Now let this sit and simmer together for another 2-3 hours. The lamb will break down and soak up the reduced, concentrated sauce. Now, I realize not everyone can wait that long, so truly it is up to you. I have found that the full 8-10 hours of this recipe gives this lamb the most shredded, rich and flavorful outcome, but it will be good at any stage!
Serve this with an exotic rice pilaf, cous cous or assemble them as my famous lamb tacos! For the tacos you will need:
- Pomegranate Pickled Relish
- Lemon Garlic Labne
- Arabic Green Herb Salad with Bergamot Lemon Dressing

Tatziki Dip

Ah the Tatziki...or as we say in arabic, zebady. This is a staple at every dinner table I can recall. It is a dipping sauce, a rice binder, a palate cleanser and can go on top of practically every type of fish, poultry, vegetable or meat dish you can imagine.
Zebady is a very simple side dish that can be whipped up with just a few ingredients. Everything can be altered to your personal taste buds, so find your happy place! There are many ways you can also make your tatziki unique. Feel free to substitute the cucumber with yellow or red beets or even add strips of sun dried tomato. That would be pretty yummy on some chicken. Anyways, here's my basic zebady recipe!
Here's what you'll need:
1 cup of thick plain yogurt
3 garlic cloves
1 lemon
1/2 cup shredded cucumber
1 tsp dried mint
salt
pepper
1. Combine the yogurt, lemon, salt, and touch of pepper to taste.
2. Grind your garlic all the way into a paste form. This can be done in a garlic press or if you don't have one, take a pinch of salt and add it to your minced garlic. Take the side of your knife and smash, dragging the garlic paste towards you. You'll notice that the salt gives it just enough abrasion to turn into a paste. ;)
That is your base! Cucumber and mint continued:
3. Add your dried mint
4. Shred your fresh cucumber and drain in a cheesecloth. This is important as you don't want too much excess liquid in your yogurt dip.
5. Add your cucumber on top as I like to do, or fold it in.
You are ready to dip in!
A few other ideas that came to mind for a 2.0 version.
Zebady base + sriracha = Spicy twist for chicken or kofta
Zebady base + dried oregano + sundried tomato = Roasted touch for shish tawook or chicken kabob
Zebady base + dried taragon + kalamata olives = Briney twist for a topping on white fish
Fresh Pasta Dough
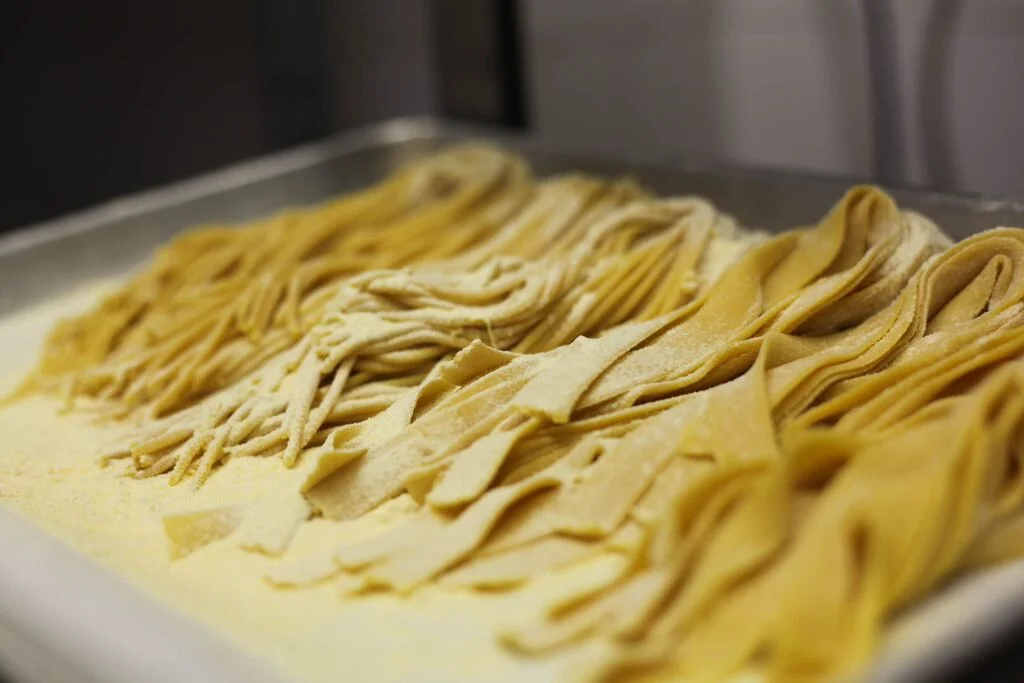
If there was one thing I would urge any foodie to do, it would be making fresh pasta dough. That box of spaghetti from the market does not come close to what you can whip up at home. I understand it may not be your everyday solution to a carb craving evening, but it should be a staple to a serious pasta dinner once and a while.
Here's what you'll need:
1 lb AP flour (or half Ap and half 00)
4 eggs, 1 yolk
3 tablespoons olive oil
Few tablespoons water on hand
Pinch of salt
1. Sift your flour onto your working surface. Create a well in the center. (If you'd rather do this in a bowl, just use a big one and follow the same steps)
2. In the center of the deep well, add the eggs, olive oil and pinch of salt.
3. Whisk the wet ingredients and slowly add parts of the inner wall of flour to the center.
4. Keep adding until the dough begins to form.
5. If it looks a bit dry, add a few tablespoons of lukewarm water.
6. Once the dough has picked up most of the flour it's time to knead!
7. Knead the dough for about 10 minutes until you see a nice smooth, shiny dough. When you press the dough with your pointer finger it should spring back into place.
8. Time to rest! Form the dough into a ball and wrap tightly in plastic wrap and keep in a cool place for at least 30 minutes.
9. Get ready to roll. Cut your dough into quarters for easy rolling. If you have a pasta machine, take a quarter of your dough and flatten a bit so that it fits inside your attachment. You want to fold this piece over 4 times before moving onto thinning the dough out. If doing this by hand, roll out your piece of dough until desired thickness.
10. If using a machine, continue thinning out your sheet of dough to your desired preference. The thicker, the more al dente so be sure to choose the right thickness depending on your shape. Most suggest going to the 7th setting.
11. Cut it by hand! For thicker pieces like papardelle, fold your thinned sheet onto itself a few times and slice vertically. You'll end up with beautiful thick ribbons of carb heaven. You can also do this to create linguine, fettuccine and other flat shapes including ravioli squares or lasagna sheets.
12. Cook it! For fresh pasta, it's best to let it sit for 10 minutes just to firm up a bit. Add it to some boiling salted water and cook for just about 30-60 seconds MAX. Your pasta should still have a slight bite.
13. Store it! Fresh pasta can keep in the fridge for up to 3 days covered. You can also freeze fresh pasta at this point and can keep for months with this method. If needing to dry, you can either hang it on a drying rack or an old fashioned hanger. You can also lay it out to rest on a baking sheet. Just be sure to dust the strands or sheets with some semolina or all purpose flour to ensure the strands don't stick.
14. Keep moisture out! Just a tip to remember, fresh pasta and moisture don't mix well when it comes to drying your pasta. It is very susceptible to growing mold if not dried properly, so if you are laying it out on a baking sheet, make sure the noodles have a little breathing room to ensure even drying.
Enjoy!